How to Perfect Your Grip: Back to basics with hand placement
Drill from Matt Bevan, Ballyhack Head Golf Professional
There is no better time to build on your foundation for success by double checking the most important, and often overlooked basic, fundamental in golf: the grip. Your hand placement on the golf club controls the club face and how the club will ultimately be delivered into the golf ball. Practice these checkpoints now, and I guarantee you will reap the benefits and need to purchase fewer golf balls the next time you’re at the club!
Ideally, you will have a golf club in the office or at home to practice the following steps and ensure you are on track. Alternatively, you can utilize a grip sample from the golf shop or grab a pipe cutter and sacrifice one of those old dust collectors in the garage! Of course, practicing hand placement on the grip using an entire club would be preferential, but there may be times when the cut-down option may be the only one available.
Remember when using a complete club that the grip should be perfected with the club face leading edge pointing directly to the ceiling / perpendicular to the ground when your arms are extended in front of you at waist height. This will ensure a “square” club face when you place the club on the ground.
Practicing Your Grip
(Left-handed golfers should reverse hand placement.)

Left hand placement
Place your left hand toward the top of the grip, making a V shape between your thumb and forefinger pointing between chin and trail shoulder
Ensure two or three knuckles visible (without leaning over to the left to look!)
Your thumb should rest slightly to the trail side of the grip (do not extend or stretch the thumb)
The grip should run more closely to the fingers than the palm; just imagine how you would hold a hammer to hit a nail into the wall
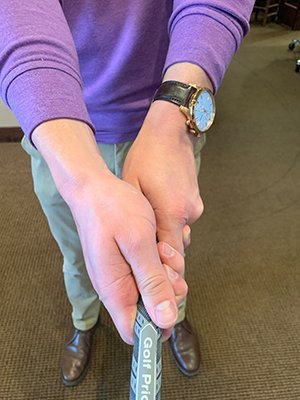
Right hand placement
Place your right hand beneath the left hand and overlap or interlock the pinky finger of the right hand in the groove created between the first two fingers of the left hand
If you have larger hands, you may prefer to overlap rather than interlock
Ensure that the V shape formed between the thumb and forefinger runs parallel to the left-hand V configuration in the previous picture
Rest your thumb just slightly to the lead side of the grip
Ensure hands are close enough together and ‘neat and tidy,’ with very limited grip material to be seen between the fingers
The grip will fit predominantly in the fingers of the right hand, with the thumb pad resting on and covering the entire left thumb
For best results, repeatedly take your hands off the club/grip and reapply the correct grip. Practice this often, and it will become natural in short time!

For more instructional opportunities while visiting Ballyhack in Roanoke, Virginia, contact Matt at the club.
Golf professionals throughout the network are also available to assist with your grip and other areas of your game.
Not yet a member of Dormie Network? Request an invitation to join.